Vegetarian

Homemade Cherry Pie with Flaky Lattice Crust

Classic homemade cherry pie with a thick, jammy fresh cherry filling and the flakiest all-butter lattice crust. The secret to a filling that holds its shape? Reducing the cherry juices before baking.

Prep

3 hr

Cook

55 min

Total

3 hr 55 min

Rest

4 hr

Servings

8

Difficulty

medium

NK

Nibbleboard Kitchen

April 18, 2026

Be the first to rate
cherry pie recipe recipe

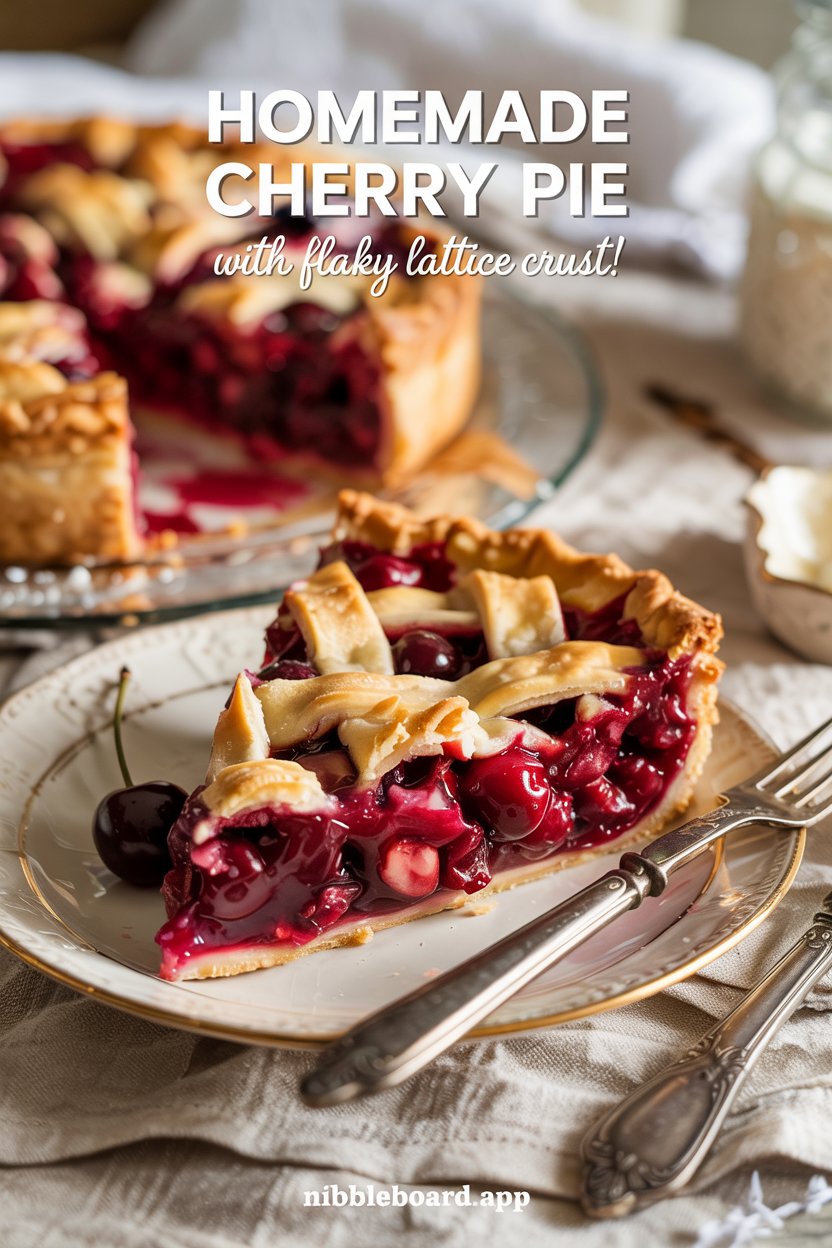
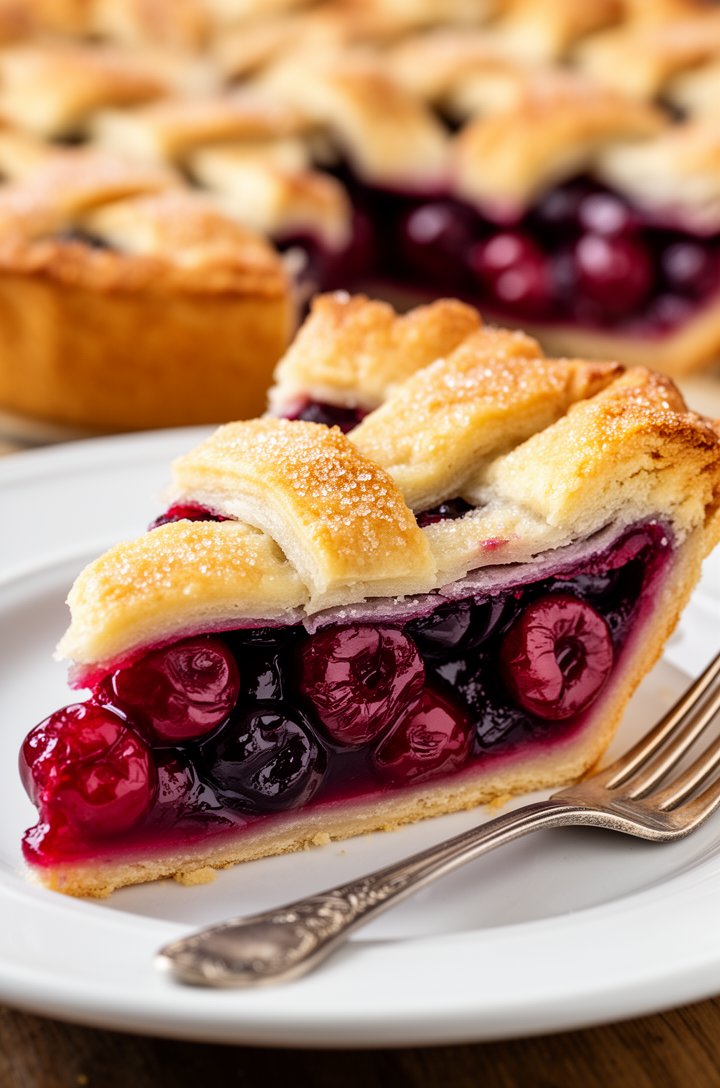
This cherry pie recipe is the real deal — thick, glossy cherry filling that actually holds together when you slice it, wrapped in the flakiest all-butter lattice crust. The trick that changed everything for me was reducing the cherry juices on the stovetop before assembling. No more soupy, runny filling. Just perfectly set, deeply fruity cherries in every single bite.

Why This Recipe Works

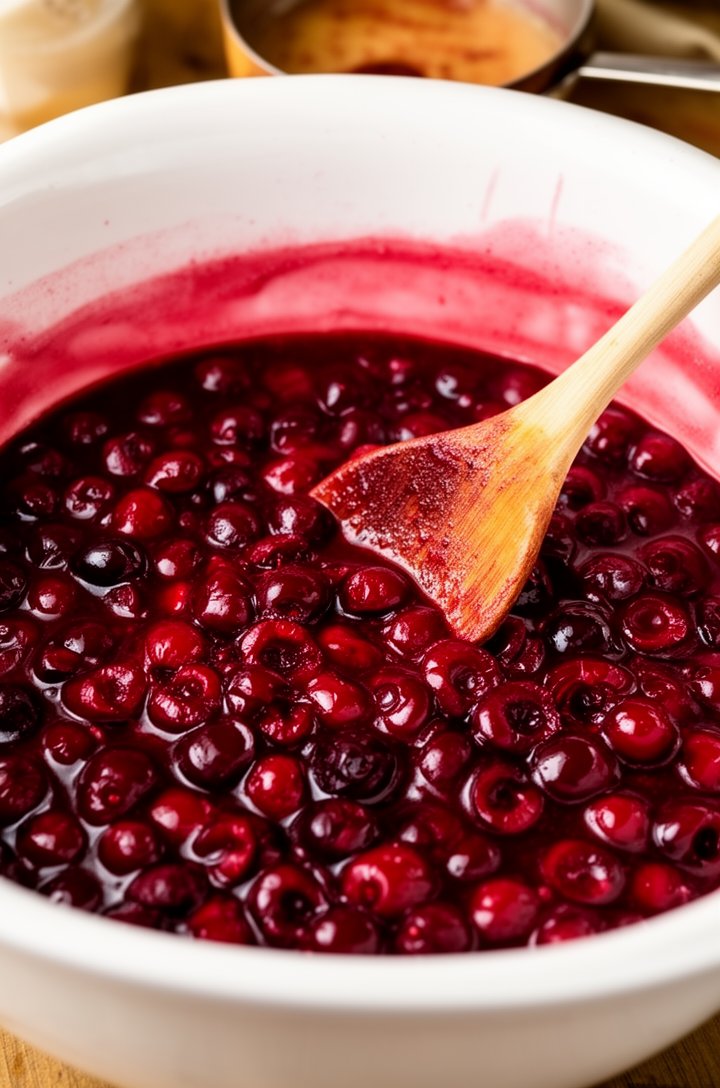
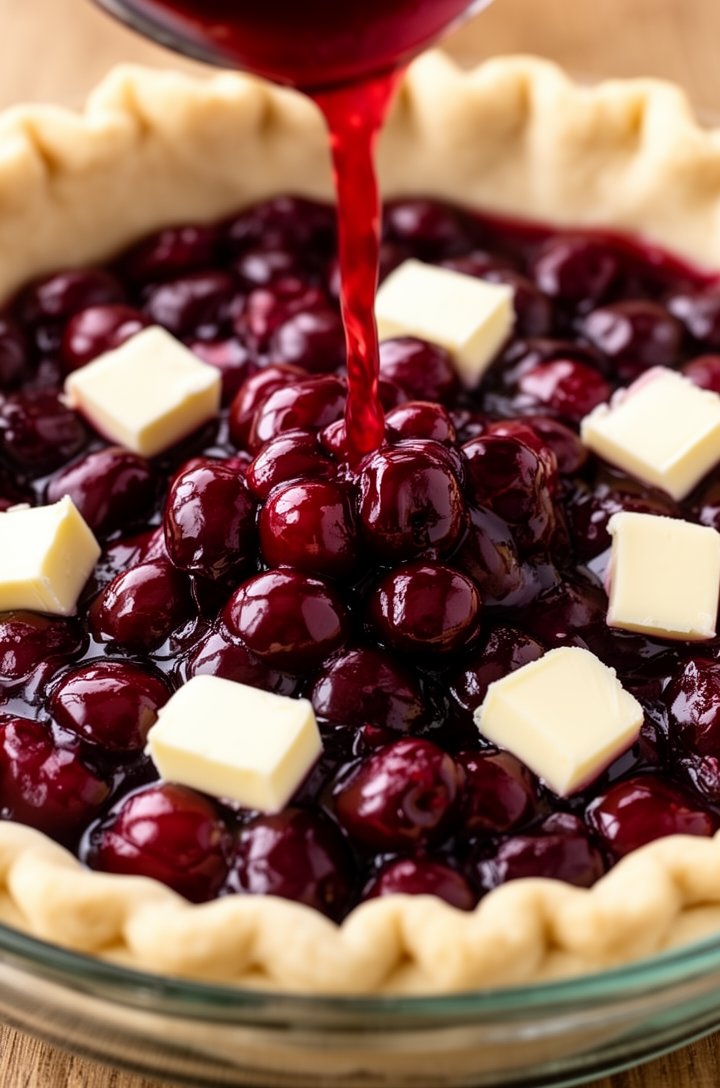
  • Reducing the cherry juices separately thickens the filling before baking, preventing a soupy center
  • Cornstarch is the ideal thickener for fruit pies — it sets firmly when cool and doesn't cloud the glossy ruby color
  • Chilling the assembled pie before baking ensures the butter in the crust stays cold, creating steam pockets that produce flaky layers
  • Starting at 400°F sets the crust quickly, then dropping to 375°F lets the filling cook through without over-browning

I bake when I'm stressed — it's my thing. And this cherry pie recipe is the one I come back to every single summer when cherry season hits. I'll be honest, my first few attempts were disasters. Gorgeous golden crust, beautiful lattice work, and then I'd cut into it and the whole thing would flood the plate like cherry soup. It took me way too many pies to figure out the fix, but once I did? Game changer. Now this pie holds together beautifully, every slice clean and thick with glossy, jammy cherries.

Overhead flat-lay of cherry pie ingredients arranged on a light marble countertop: a large white bowl overflowing with deep red fresh sweet cherries with stems still attached, a small glass bowl of gr

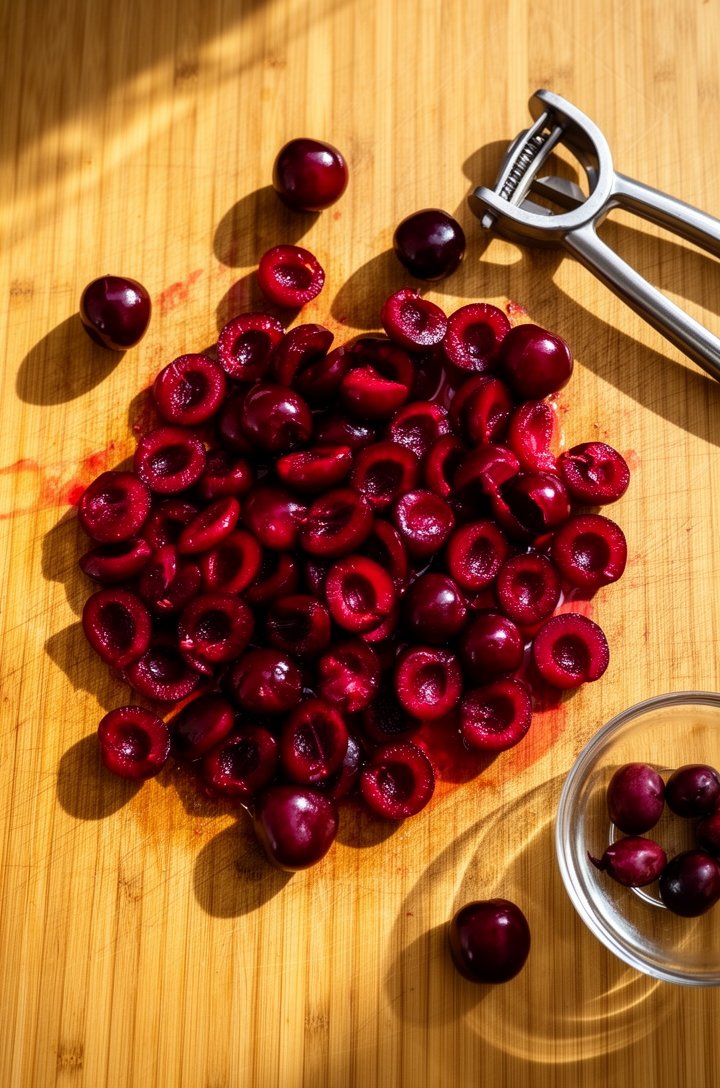
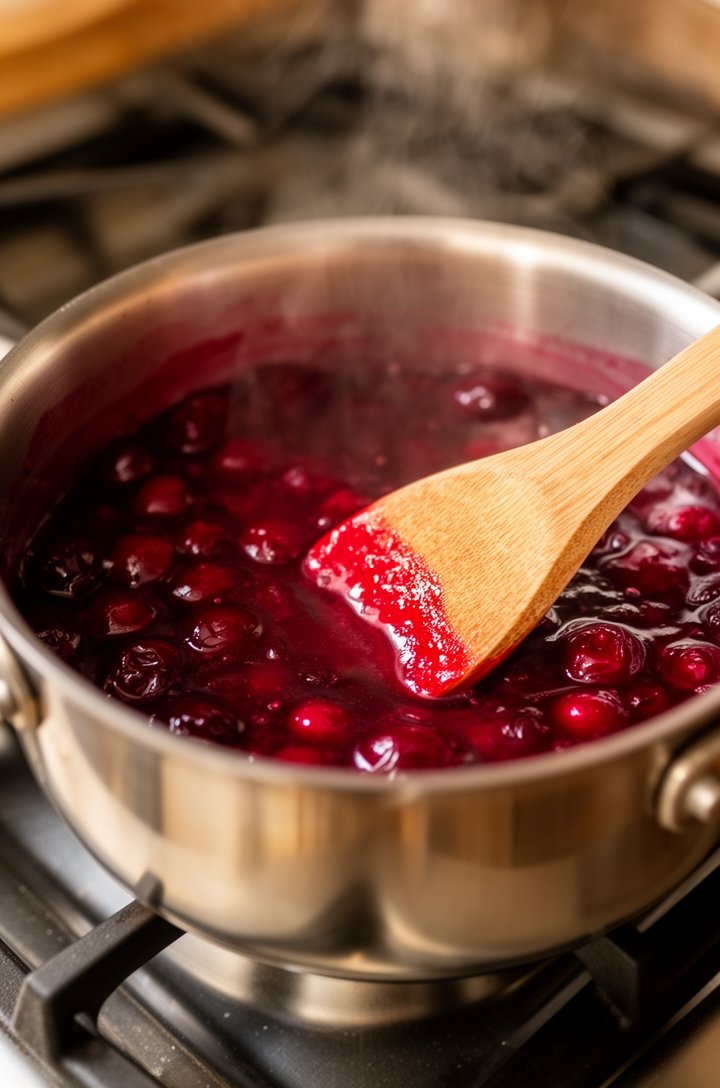
The secret is stupidly simple: before you assemble the pie, you reduce the cherry juices on the stovetop. It takes about 4 minutes. That's it. Those few minutes turn watery cherry liquid into a thick, syrupy glaze that coats every piece of fruit. Matt was skeptical the first time I did this — "you're cooking the filling before you bake it?" — but one bite of that first thick, set slice and he was a convert. Even Lily, who's been helping me in the kitchen more and more, has started doing this step herself.

Close-up top-down shot of fresh sweet cherries being halved on a wooden cutting board, a cherry pitter tool beside the pile, deep ruby-red cherry halves glistening with juice, some whole cherries scat

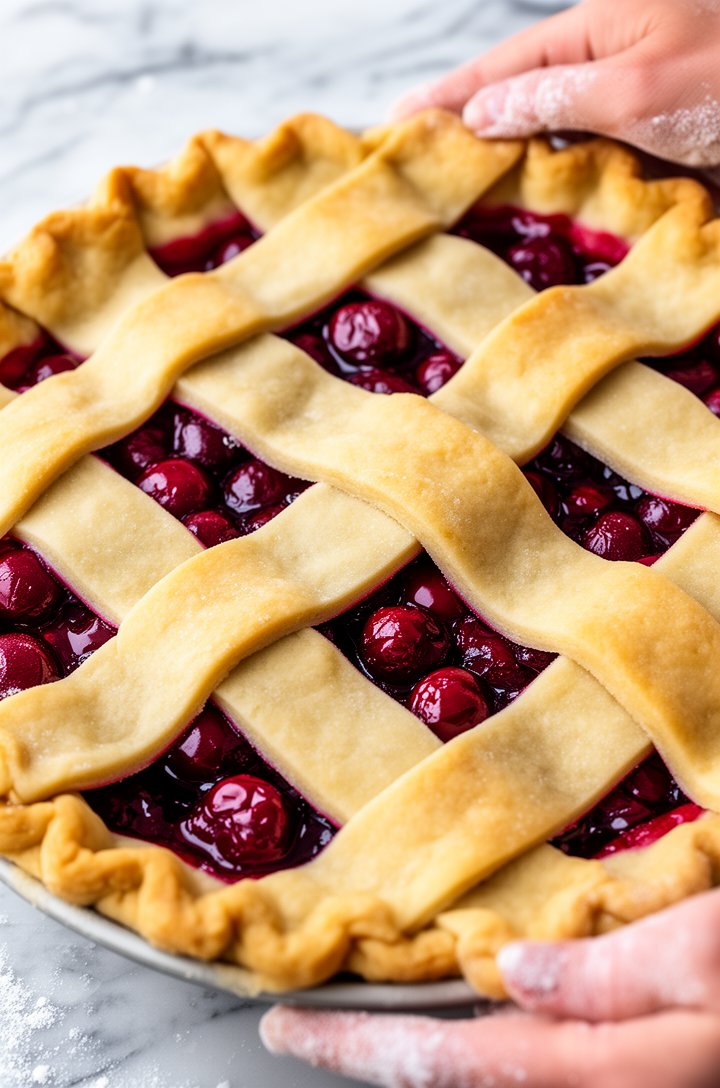
And the crust — we need to talk about the crust. All butter, no shortening, ice-cold everything. It bakes up into these impossibly flaky, golden, shattery layers that shatter when you press your fork through them. The coarse sugar on top adds the most satisfying crunch. I've brought this pie to three different potlucks at Jess's place and every single time someone asks for the recipe.

Side-angle close-up of thick ruby-red cherry pie filling being stirred in a large white mixing bowl with a wooden spoon, the cherries coated in a glossy mixture of sugar and cornstarch, visible cherry

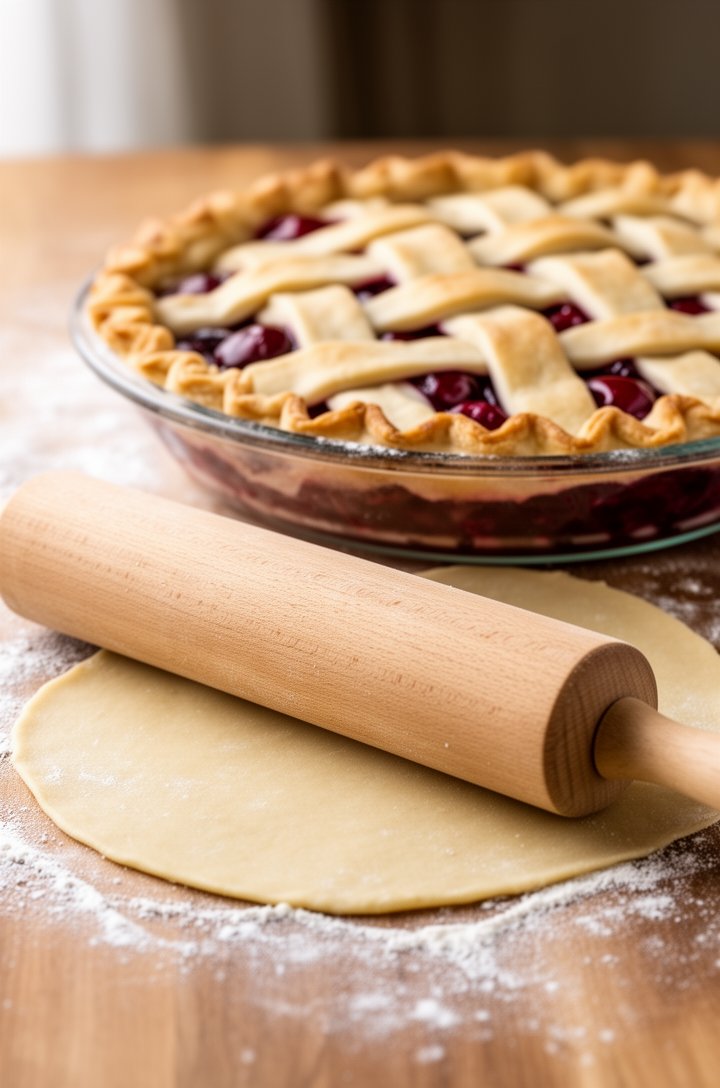
This isn't a hard pie, but it does take some patience. The dough needs to chill. The filling needs to rest. And the baked pie absolutely needs to cool for 3-4 hours before you even think about slicing. I know, it's brutal. But trust me — that patience is the difference between a magazine-worthy slice and a sad puddle. Grab your rolling pin.

Overhead shot of a whole freshly baked cherry pie with golden-brown lattice crust in a glass pie dish, sitting on a wire cooling rack on a light countertop, coarse sugar crystals sparkling on the latt Extreme close-up 45-degree angle of a single slice of cherry pie on a white ceramic plate, the lattice crust showing golden flaky layers at the cut edge, thick set cherry filling with whole halved che

How It Comes Together

Close-up of cherry juice being reduced in a small stainless steel saucepan on a gas stovetop, the liquid thick and syrupy with deep ruby color, a wooden spoon stirring showing the thickened consistency coating the back of the spoon, steam rising, warm kitchen lighting
45-degree angle shot of pie dough being rolled out on a floured wooden surface with a wooden rolling pin, the dough thin and circular about 12 inches across, visible flour dusting, a 9-inch glass pie dish waiting nearby, soft natural side lighting
Overhead close-up of cherry filling being poured into the unbaked pie crust in a glass dish, glistening dark red cherries mounded in the center, the pale crimped crust edge visible around the perimeter, small cubes of cold butter dotted on top of the filling, warm natural lighting
Close-up overhead shot of lattice strips being woven over the cherry pie filling, partially completed lattice showing the weaving technique, deep red cherry filling peeking through the gaps between golden dough strips, flour-dusted hands visible at the edge of frame, bright natural lighting on a marble countertop
Side-angle shot of the finished baked cherry pie being lifted from the oven on a baking sheet, deep golden-brown lattice crust glistening with egg wash and coarse sugar crystals, dark cherry filling actively bubbling through the lattice gaps, oven mitts visible, warm amber oven light

Chef Tips

  • I've found that reducing the cherry juices separately on the stovetop is the single biggest upgrade you can make. It concentrates the flavor and thickens the filling so your slices hold together instead of collapsing into a puddle.
  • Keep everything cold — the butter, the water, even the bowl if you can. After trying it both ways a dozen times, I can tell you cold butter is what creates those flaky, shattery layers in the crust.
  • Don't skip the 3-4 hour cooling time. I know it's painful to stare at a gorgeous pie and not eat it, but warm filling equals soup. Ask me how I know.
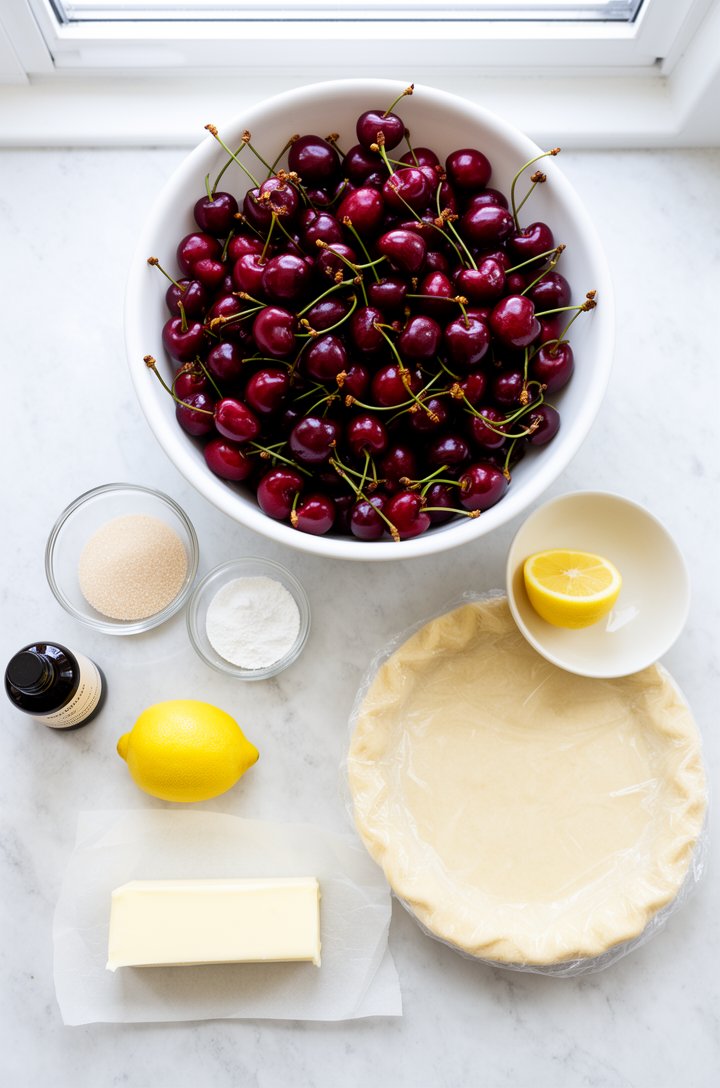
  • No fresh cherries? Use 2 bags (about 24 oz total) of frozen sweet cherries, thawed and well-drained. Frozen actually work beautifully here — I use them most of the year.
  • A quarter teaspoon of almond extract sounds tiny but it makes a huge difference. It doesn't make the pie taste like almonds — it just makes the cherries taste more like cherries.

Variations

Cherry Crumble Top Pie

Skip the lattice and top with a buttery streusel instead: 1/2 cup flour, 1/3 cup brown sugar, 1/4 cup oats, 6 tbsp cold butter, pinch of cinnamon. Crumble over the filling and bake as directed.

Sour Cherry Pie

Swap sweet cherries for tart/sour cherries and increase sugar to 1 cup. Sour cherries make a tangier, more traditional-bakery-style filling.

Cherry Almond Pie

Increase almond extract to 1/2 teaspoon and sprinkle 1/4 cup sliced almonds over the filling before adding the lattice top.

Serving Suggestions

Serve at room temperature or gently warmed with a scoop of vanilla ice cream or a dollop of fresh whipped cream. A slice alongside a cup of black coffee is hard to beat.

Make It Ahead

Prepare the pie dough up to 3 days ahead and refrigerate, or freeze for up to 3 months. The fully assembled unbaked pie can be frozen — bake from frozen, adding 15-20 minutes to the bake time.

Homemade Cherry Pie with Flaky Lattice Crust

Classic homemade cherry pie with a thick, jammy fresh cherry filling and the flakiest all-butter lattice crust. The secret to a filling that holds its shape? Reducing the cherry juices before baking.

Prep

3 hr

Cook

55 min

Total

3 hr 55 min

Rest

4 hr

Servings

8

Difficulty

medium

Calories

545

Print
Share:

Ingredients

servings

Pie Crust

Cherry Filling

Egg Wash

Instructions

  1. 1

    Make the pie crust. Whisk flour, sugar, and salt in a large bowl. Add cold butter cubes and cut in using a pastry cutter or your fingers until the mixture resembles coarse crumbs with some pea-sized pieces remaining.

  2. 2

    Drizzle in ice water 1 tablespoon at a time, mixing with a fork after each addition, until the dough just comes together when squeezed. Divide into two equal discs, wrap tightly in plastic wrap, and refrigerate for at least 2 hours or overnight.

    120 min

  3. 3

    Make the filling. Toss halved cherries with sugar, cornstarch, lemon juice, vanilla extract, and almond extract in a large bowl until evenly coated. Let sit for 10 minutes so the cherries release some juice.

    10 min

  4. 4

    Strain the cherry juices into a small saucepan through a fine mesh strainer, keeping the cherries in the bowl. Cook the juice over medium-low heat, stirring constantly, until it thickens and reduces slightly, about 3-4 minutes. Let cool for 5 minutes, then pour it back over the cherries and stir to combine.

    4 min

  5. 5

    Roll out the bottom crust. On a well-floured surface, roll one disc of chilled dough into a 12-inch circle, about 1/8-inch thick. Gently transfer to a 9-inch pie dish, pressing it into the bottom and up the sides. Trim any excess overhang to about 1 inch. Refrigerate while you prepare the lattice.

  6. 6

    Pour the cherry filling into the chilled pie crust, mounding slightly in the center. Dot the top with small cubes of cold butter.

  7. 7

    Roll the second disc of dough into a 12-inch circle. Using a sharp knife or pastry wheel, cut into strips about 3/4-inch wide. Weave the strips over the filling in a lattice pattern, pressing the ends into the bottom crust edge. Fold the overhang up and over the lattice ends and crimp decoratively.

  8. 8

    Beat the egg with milk and brush the lattice top and crimped edges with egg wash. Sprinkle generously with coarse sugar. Refrigerate the assembled pie for 20-30 minutes while your oven preheats to 400°F (200°C).

    20 min

  9. 9

    Place the pie on a large baking sheet to catch drips. Bake at 400°F for 20 minutes.

    20 min

  10. 10

    Reduce the oven temperature to 375°F (190°C) and continue baking for 30-40 minutes, until the lattice is deep golden brown and the filling is bubbling through the gaps. If the edges brown too quickly, tent with foil.

    35 min

  11. 11

    Remove from the oven and cool completely on a wire rack for at least 3-4 hours before slicing. The filling needs this time to set — cutting too early means a runny pie.

    240 min

Equipment

9-inch pie dishrolling pinlarge mixing bowlsmall saucepanpastry brushwire cooling rackbaking sheetsharp knife or pastry wheel

Nutrition per Serving

545

Calories

7g

Protein

74g

Carbs

26g

Fat

4g

Fiber

34g

Sugar

256mg

Sodium

Estimated Cost

$20.65total
$2.58per serving

*Based on average US grocery prices

Storage & Leftovers

Storage: Cover loosely with foil or plastic wrap and store at room temperature for 1 day, or in the refrigerator for up to 5 days.

Reheating: Warm individual slices in a 350°F oven for 10-15 minutes until the filling is gently warmed through and the crust re-crisps.

Freezing: Freeze baked pie whole (cooled completely) wrapped tightly in plastic and foil for up to 3 months. Thaw overnight in the fridge, then warm in a 350°F oven for 15 minutes.

AmericanHolidayDate Night

Frequently Asked Questions

Nutrition Facts

8 servings | 1 slice

Calories545

% Daily Value*

Total Fat 25.8g33%
Total Carbohydrate 73.7g27%
Dietary Fiber 3.7g13%
Total Sugars 34.4g
Protein 6.7g13%
Sodium 256mg11%

*Percent Daily Values based on a 2,000 calorie diet.

Reviews & Comments

No reviews yet. Be the first to leave a review!

You Might Also Like